How To Capture A Good Panoramic
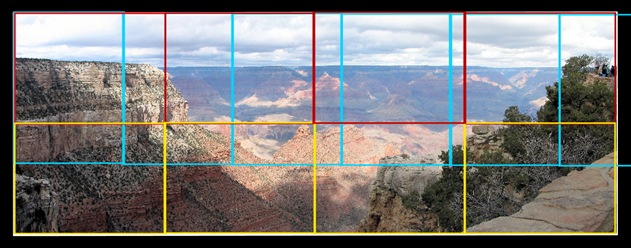
Shot Preparation: First, you need to pick a spot with an unobstructed view of the scene you wish to capture and to make sure that there are not too many moving objects in the scene that might create problems during the stitching process. After selecting the subject, you then need to determine how to best capture the scene. Assuming that you have your camera set to a 4:3 ratio, the picture of the Grand Canyon below shows the options you have for shooting. (Option 1- Red) Compose the scene and capture four landscape shots - left to right. (Option 2 - Using both Red and Yellow) This was used to make the above landscape. Center the horizon line and take four left to right landscape shots; then lower the camera, making sure you have at least a 20% overlap, and take another four left to right landscape shots. (Option 3 - Blue) Turn the camera to take five or six left to right portrait shots.
Some people then "activate" the grid option in their viewfinder to help with the alignment of the horizon and left-to-right frame movement. NOTE: You can move in either direction, left-to-right or right-to-left. Whatever you choose, I find it best to be consistent. I personally find having the ‘grid option’ turned on annoying and feel that this can be accomplished manually if you are careful. Before moving left-to-right, always select an object or point of reference in the previous frame that will allow you to rotate and capture the next ‘frame’ with approximately a 25% overlap. Next, set your exposure mode to manual, selecting the appropriate aperture and shutter speed for the scene. This will ensure that all of the pictures will have the same exposure; an important element when it comes to stitching panoramic pictures. NOTE: Though you can take these shots with your camera set to an auto mode (iA), you run the risk of a problem if the lighting changes during shooting due to the sun moving behind or coming out from a cloud. Finally, position you body so that you can capture the entire range of the scene by just pivoting your upper torso and not having to move your feet. This will help to insure that your camera stays level. TIP: Turning your camera sideways to capture the shots in a ‘portrait’ mode will allow you to get more of the foreground into the shot. Though you will have to take more frames and be more careful when rotating in order to maintain an overlap, it will provide you with a ‘higher’ picture and give you more freedom during cropping. | |||
| Taking the Shot: When taking hand-held shots, remember to keep your arm firmly against your body and your hand steady and rigid. As you pivot your torso for each remaining shot, make sure that there is a minimum overlap of at least 20% for each one. Even though you can obtain excellent results without a tripod by following these guidelines, its use can sometimes make the process easier and more assured. | |||
| Editing the Shots: Once you have copied your digital negatives to your computer, select a graphics editing software to begin the process of stitching the images together. I am currently using the free program, Hugin - Panorama photo stitcher. Regardless of the program you choose to use, once you have selected the images, the program will automatically begin the stitching process. Once the images are stitched together, you can use the stitching program to resize the image and crop out any unwanted areas. Once you have saved the stitched image, you can use editing software to make other adjustments to color, tone, lightness, darkness, contrast, saturation, sharpness, etc. |
Saturday
Taking Panoramas
Subscribe to:
Post Comments (Atom)


No comments:
Post a Comment